If you are reading this then you have successfully done lesson one and lesson two. I realize that you may just be reading and not doing also. Well, that’s all right also. In fact if you read through the entire literature first before using the carving tools that’s a great idea! In this lesson I will guide you through some carving and yes, finally you will get to use your carving knife. To begin with you have to realize that if this is your first time carving something in wood, you may want to take things slow and rely on your extreme patience. I can not overstate this.
First, hold your knife in the preferred hand and feel the handle embracing most of the handle with your four fingers. Control of the knife is important, and I suggest that your thumb be placed in a comfortable position opposite the cutting edge of the knife. In other words, don’t hold the knife as you do a baseball bat for strength. You may want to experiment on an extra piece of wood especially if this is your first time in actually removing or carving wood. Let me suggest this first; take an extra piece of basswood and hold it in your opposite hand, placing such hand as to prevent being cut with the knife’s edge. While holding the wood approach the area you will carve out with the blade of the knife and imagine a starting point. Place the edge there. If you are holding the knife in your right then the wood is being held with your left hand. Opposite for left-handed people. If the edge of the knife is on the wood try placing your left thumb behind the blade for better control as you shave off a thin piece of shaving off the practice wood. Experiment with this action using both hands for a much more controlled action than just whittling away randomly.
Here is another action you may want to try before you start on your permanent wood robot figure. Using your practice wood draw a straight line with the aid of a ruler or straight edge upon the wood approximately 1/4 inch from an edge. This line should be parallel to the edge of the piece of wood. The line should be following the grain of the wood. What you are going to do next is to cut on the line with the knife as straight as possible. You may even pretend that the knife is now a cutting pencil and you are cutting into the line approximately 1/16 of an inch into the line. You might want to do this two or three times, that is cut into the same line until you feel the depth of 1/16 of an inch is reached. Remember this is an approximation. Your next step is to remove the area from the line to the edge of the wood using your woodcarving knife. Try using the method I mentioned previously of using your left thumb behind the knife’s blade for better control. After you remove the wood you should be left with a piece of basswood that has a chunk of wood missing at one of its corners all along the length of the piece of wood. Carpenters sometimes use chisels for a job like this or other electric tools. If you are an experienced woodcarver you may bypass this exercise and start carving your wood robot blank.
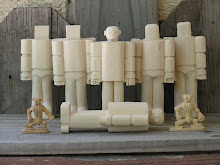
Your wood robot blank is a basic outline of your final product. Imagine where the feet and legs of the finished robot go. You should be able to see where the arms and hands are on your blank. Your head is on the top of the blank. Lets begin from the ground up. Just like a carpenter does when he decides to build a house. Draw a straight line down the center of the large leg which is holding up the robot. The ultimate purpose of this action is to eventually cut into this part of the blank in order to divide the two legs and feet. Using your carving knife like a cutting pencil cut into this line which starts at the bottom of the body down to the floor and remove wood on either side of this line. Eventually your robot will start looking like it has two legs and two feet. Let me give you another suggestion, use your coping saw if you decide to go ahead and split the two legs and feet apart to where they will have a clearing in between each other. This is optional and you may decide either way.
The idea of spitting the two legs and feet brings you to the point where you decide to make the legs and feet square in nature or cylinder in nature. Do you get my drift? Study your figure at this time and try to visualize the legs in their future state. If you want to be lazy, leave them alone and you have square-type legs which are connected to square-type feet. Now, on the other hand you may want to round off some wood and produce cylinder- shaped legs and carve out some shoes for your wood robot. This latter routine will be fun to make; just remove or carve wood all around the legs until you are satisfied with the amount of wood removed. It’s your wood robot and you can create fat legs or skinny legs or really any shaped legs your mind can conceive.
In this process, lesson three, you have practiced carving into a throw away piece of wood. Hopefully this has helped you understand the patience needed in carving. Take all the time you need. Never be in a rush! Remember, this is suppose to be fun not work. The second part of this lesson three took you into carving the legs and feet of the wood robot. I have allowed you to be creative. The legs and feet should be the easiest part of the wood robot. If you cut off small areas you won’t ruin the robot because you can stop at any time. On the other hand don’t be in a hurry and remove too much wood off the legs and later say, "Oops, I took off too much and now I can’t put the wood back on!" Well I suppose you can always make another blank, but you do remember how long it took you to make the first one? If you begin to love carving as much as I do then I suppose making lots of blanks wouldn’t matter. If fact that might be a good idea, make a bunch and if you feel you have made some mistakes start another robot. Until next time, keep on carving wood robots.
Tuesday, May 26, 2009
Subscribe to:
Comments (Atom)