If you are reading this then you have successfully done lesson one and lesson two. I realize that you may just be reading and not doing also. Well, that’s all right also. In fact if you read through the entire literature first before using the carving tools that’s a great idea! In this lesson I will guide you through some carving and yes, finally you will get to use your carving knife. To begin with you have to realize that if this is your first time carving something in wood, you may want to take things slow and rely on your extreme patience. I can not overstate this.
First, hold your knife in the preferred hand and feel the handle embracing most of the handle with your four fingers. Control of the knife is important, and I suggest that your thumb be placed in a comfortable position opposite the cutting edge of the knife. In other words, don’t hold the knife as you do a baseball bat for strength. You may want to experiment on an extra piece of wood especially if this is your first time in actually removing or carving wood. Let me suggest this first; take an extra piece of basswood and hold it in your opposite hand, placing such hand as to prevent being cut with the knife’s edge. While holding the wood approach the area you will carve out with the blade of the knife and imagine a starting point. Place the edge there. If you are holding the knife in your right then the wood is being held with your left hand. Opposite for left-handed people. If the edge of the knife is on the wood try placing your left thumb behind the blade for better control as you shave off a thin piece of shaving off the practice wood. Experiment with this action using both hands for a much more controlled action than just whittling away randomly.
Here is another action you may want to try before you start on your permanent wood robot figure. Using your practice wood draw a straight line with the aid of a ruler or straight edge upon the wood approximately 1/4 inch from an edge. This line should be parallel to the edge of the piece of wood. The line should be following the grain of the wood. What you are going to do next is to cut on the line with the knife as straight as possible. You may even pretend that the knife is now a cutting pencil and you are cutting into the line approximately 1/16 of an inch into the line. You might want to do this two or three times, that is cut into the same line until you feel the depth of 1/16 of an inch is reached. Remember this is an approximation. Your next step is to remove the area from the line to the edge of the wood using your woodcarving knife. Try using the method I mentioned previously of using your left thumb behind the knife’s blade for better control. After you remove the wood you should be left with a piece of basswood that has a chunk of wood missing at one of its corners all along the length of the piece of wood. Carpenters sometimes use chisels for a job like this or other electric tools. If you are an experienced woodcarver you may bypass this exercise and start carving your wood robot blank.
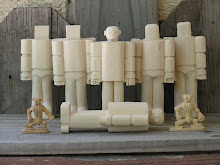
Your wood robot blank is a basic outline of your final product. Imagine where the feet and legs of the finished robot go. You should be able to see where the arms and hands are on your blank. Your head is on the top of the blank. Lets begin from the ground up. Just like a carpenter does when he decides to build a house. Draw a straight line down the center of the large leg which is holding up the robot. The ultimate purpose of this action is to eventually cut into this part of the blank in order to divide the two legs and feet. Using your carving knife like a cutting pencil cut into this line which starts at the bottom of the body down to the floor and remove wood on either side of this line. Eventually your robot will start looking like it has two legs and two feet. Let me give you another suggestion, use your coping saw if you decide to go ahead and split the two legs and feet apart to where they will have a clearing in between each other. This is optional and you may decide either way.
The idea of spitting the two legs and feet brings you to the point where you decide to make the legs and feet square in nature or cylinder in nature. Do you get my drift? Study your figure at this time and try to visualize the legs in their future state. If you want to be lazy, leave them alone and you have square-type legs which are connected to square-type feet. Now, on the other hand you may want to round off some wood and produce cylinder- shaped legs and carve out some shoes for your wood robot. This latter routine will be fun to make; just remove or carve wood all around the legs until you are satisfied with the amount of wood removed. It’s your wood robot and you can create fat legs or skinny legs or really any shaped legs your mind can conceive.
In this process, lesson three, you have practiced carving into a throw away piece of wood. Hopefully this has helped you understand the patience needed in carving. Take all the time you need. Never be in a rush! Remember, this is suppose to be fun not work. The second part of this lesson three took you into carving the legs and feet of the wood robot. I have allowed you to be creative. The legs and feet should be the easiest part of the wood robot. If you cut off small areas you won’t ruin the robot because you can stop at any time. On the other hand don’t be in a hurry and remove too much wood off the legs and later say, "Oops, I took off too much and now I can’t put the wood back on!" Well I suppose you can always make another blank, but you do remember how long it took you to make the first one? If you begin to love carving as much as I do then I suppose making lots of blanks wouldn’t matter. If fact that might be a good idea, make a bunch and if you feel you have made some mistakes start another robot. Until next time, keep on carving wood robots.
Tuesday, May 26, 2009
Wednesday, May 20, 2009
Second Lesson on Carving Wood Robots
Welcome back. Let’s get to it. This is lesson II on Carving Wood robots. You may want to review lesson I from my previous article, however, if you are holding your finished wood blank then you are ready to continue. First keep in mind that this is a primary wood blank You can still remove more wood with your coping saw before reaching for your carving knife. Let me explain. Your wood robot’s head should end up smaller than the body. So with your coping saw remove 14/16 inch from the left and the same amount of wood from the right. Then remove 5/16 inch from the front of the head and remove 5/16 from the back of the robot’s head. Your blank should now have a head sitting on top of a bulky body.
Next work on the arms. With the coping saw remove 7/16 inch from the front of the right arm and remove the same from the back of the same arm. Do this same procedure on the robot’s left arm. Remember to use the same measurements. Looking at your figure you should see a resemblance of two robot arms on each side, and you haven’t used a carving knife yet. Your figure’s arms should look almost square from the top but actually they might measure approximately 9/16 by 10/16 inch. Don’t worry about exact measurements at this time. You can eyeball this whole project and use approximate judgement. Now you have a wood robot type shape where you can distinguish a head, two arms and one leg upon which the carved wood robot stands proudly on.
So far you have only used the coping saw and have only cut straight lines with it. Did you know that a coping saw can cut angles, curves and bends? With this little miniature saw you can perform many different cuts and even give the electric scroll saw some competition. At this point in your project, carving wood robots, you can plainly see that your figure has a front and a back that look identical. Well, you decide which side will be the front and of course the back will be the opposite side. Keep in mind that the two arms are on the sides. Now that you have decided which side is the front of the wood robot, the next step will be in sawing off a portion of the front legs, but first decide how big the robot’s feet will be in terms of height. I usually make the feet at ½ inch in height. To do this measure ½ inch from the robots bottom up along his leg where the feet would be. Draw a line from the front of the future feet toward the back a ½ inch. From that point measure 2 and 3/16 inches from the top of the future feet to the bottom of the robot’s body. In reality you will be cutting or removing a long rectangular piece of wood that should measure approximately ½ inch by 2 and 3/16 inches from the front of the robot’s legs. An important note: when cutting or sawing toward both arms do not accidently cut the lower parts of both arms which happen to be the future hands! I am referring to when you get ready to cut underneath the body.
After you finish what is described in the last paragraph cut a similar piece from the back of the legs but not as wide, make it 2 and 3/16 inches long but only 3/16 of an inch wide. Again do not cut into the portion of the robot that will eventually become the hands of the carved wood robot. By this time your wood robot should begin looking like a wood robot but with no details. This is what I will refer to as the secondary wood blank. Study your figure and imagine what you plan to do next. Visualize where the eyes will go if you decide to place eyes on its head. Turn your wood robot around and view it from all angles and configure what you will add or take away from his arms or legs. Ask yourself, "Will my robot’s body be square in nature or rectangular or will I decide on making a cylinder body?" There are many variations one can take from this point.
Let us review. You are sitting there looking at what most woodcarvers call a blank. Your robot’s shape is outlined and literally ready to be carved. Be proud. You have accomplished quite a lot! So far you have used the coping saw and removed unnecessary pieces of wood. Basically, you have experienced using this fine little instrument and witnessed its potential. I was told once by a great contemporary carver that he thought that the great sculptors such as Michelangelo had to have used saws in their work. Without saws the projects would have taken too long and certainly made the job a lot harder to accomplish. My sincere thanks for reading this article, and until next time, keep on carving wood robots.
Friday, May 1, 2009
First Lesson on Carving Wood Robots
Carving wood robots can be an exciting hobby if you have some extra time for yourself to indulge in. Since the beginning of mankind carving has been an intricate part of our evolution as a species; what better way to express oneself than through the oldest art form. The best part of all this is that all you need is a sharp carving knife, a coping saw and a sincere desire to create!
First of all you will need to have the following tools to work with: A sharp carving knife preferably one that holds a sharp edge, a coping saw and a small piece of basswood. The piece of basswood should measure 5 and 3/4 inches tall by 2 and 10/16 inches across by 1 and 9/16 inches deep. Basically the wood should resemble a small rectangle. I recommend basswood because it lends itself to carving, it is easy to carve into and you can purchase it from most hobby stores. If you can’t find basswood in your particular area you may try looking for some online. Wood carving supply houses could be an alternate choice.
In choosing a carving knife you may want to do a little research. These are my recommendation: choose a sharp knife preferably one that will hold an edge. This is the most important factor in carving wood robots. A razor-sharp knife is your best friend in terms of carving. Old woodcarvers all agree that a dull knife only discourages you to the point of quitting any project. A dull instrument can only bring frustration and possibly cutting accidents both on the wood and your hands! The blade should be no bigger than inch and a half. This will facilitate your handling of the instrument and keep you close to your work. A Large blade is not recommended especially for a beginning carving student. One thing to keep in mind is that we are all students and there is always something new to discover.
You might be asking yourself, "When do I start carving the wood robots?" Patience, patience and more patience.
Now, about the coping saw. Just about any coping saw will do as long as the blade is made for cutting wood and not metal. Coping saws can be purchased at any hardware store. Hobby stores and woodcarving supply houses also carry various saws. Let me recommend a coping saw that feels good in your hand and one that holds its blade steady. Some of these cheap Coping saws bend too much and are not good for cutting, especially when doing the intricate work you will engage in while carving wood robots.
In this article I will finally discuss the last factor in the opening paragraph, the desire to create. This can only come from you and your heart. Do you really want to take the time to carve a wood robot? Of course you do or you wouldn’t be reading this article. I know what you are thinking. Where are the instructions? Well, I can give some simple instructions in the next few lines but the rest will be up to you and your creativity. Let me explain. Ever since I started carving I noticed that every time I carve something, no matter how accurate the instructions are, my carvings come out different. I have carved out robots of all shapes and sizes and no matter what there are no two alike!
The following instructions are here just to get you started. If at any time you feel like quitting, do so. This is suppose to be pleasure not a difficult task. Heed my words friends, frustration leads to accidents. Yes, I have cut myself many times usually when I’m tired or unfocused. Please be careful especially when handling the knife.
Lesson #1
Study the drawing on this page. Print it if you have to but try and imagine it in a three dimensional manner. Let the body come out to you becoming closer than the two arms. Look at the two feet at the bottom and imagine them closer than the two legs. The square head should be further back than the upper body. The idea if for you to imagine what your first wood blank will look like in a three dimensional way.
Now all you have to do is make your blank look like the picture on this page. You will draw this figure onto your piece of basswood. The easiest way to do this is to either draw the picture on another piece of paper or simply print this from your computer. Using a pair of scissors cut around the parameter of the total drawing (follow the darker bold lines). You now have a flat outline of your blank in a two dimensional format. Place this on your piece of wood (the dimensions are mentioned at the beginning of this article) and proceed to trace the drawing onto your wood using a good sharp pencil. After removing the paper or stencil you now have a piece of basswood with drawing on it. Opposite this drawing on the back of the wood trace or draw the exact figure using the same stencil. Both sides of the wood should now have the same drawing. This is the piece of wood which you will cut using your coping saw. That’s right, now instead of a pencil you will proceed with a miniature saw, the coping saw. Follow the bold black line around the figure. Note, you do not have to draw in the lines that constitute the inside of the blank. That will come later. Naturally if you printed this figure from your computer you are way ahead.
Allow me to give you some useful suggestions on using you coping saw. Before any cutting is done find a way to stabilize your wood either on a vise or by using claps on a work table. This action will help you control the straight lines you will cut with your coping saw. Once you start sawing make sure you cut in straight lines; this is done by constantly checking all angels as you cut down the bold lines of the drawing. It is important to keep an eye on the back drawing, the blade of the saw should be aligned with the front and back bold lines as you cut. Otherwise you will have an uneven blank in the end. You will be cutting in vertical and horizontal lines only. If you change the wood on your vise you might get away by sawing vertical lines only. Cutting vertically is much easier that cutting horizontally. At the end of this endeavor you must end up with a primary wood blank that looks identical from the back as well as the front.
Other tools you may want to use from a carpenter’s tool box may include a six inch square, a ruler, a pencil with a good eraser, some wood files and anything else that will help you cut a straight line on the basswood. After you finish this lesson, you may want to take a break. This concludes the first lesson on carving wood robots. Keep checking this site for further lessons. Until next time, keep carving wood robots.
Thursday, April 16, 2009
Carving Robots from Wood "Proper Paraphernalia"
Every hobby one approaches requires the use of specialized tools. There is no getting out of this and of course, "deciding how much money to spend" is aways lurking in the back of one's mind. It will be up to you to make that decision, but for now I will introduce the tools required for carving wood robots. I promise to keep it to a minimum.
The first and most important tool is the knife. I cannot stress the importance of a good solid made carving knife. There are numerous examples out there and if you are fortunate enough to live in the vicinity of a woodcarver or maybe a woodcarving supply house or store, then you may want to explore all those possibilities. Brands and other commercial factors are not as important as how the knife feels in your hand. Also, the blade for a beginner should not exceed an inch or an inch and a half. After carving a bit you will appreciate a small blade rather than too much steel. I suppose I should warn you that handling a sharp knife requires patience, skill and concentration.
Sometimes knowledge and experience sure help. Let me save you hours of work by recommending the next tool you should invest in: the coping saw. Coping saws are a life saver to a beginning student. You don't have to spend a small fortune on an electric scroll saw or even a bulky band saw. With a coping saw you may begin experimenting with forming shapes which eventually lead to your first blank. You see, when an old carver sees a piece of wood, whether it is a small block or a thick twig, he foresees the basic shape of what he intends to finish. Later on if you continue the quest to carve a wood robot, you will acknowledge this fact as very useful. Using a coping saw saves you precious time in the long run. You don't want to spend senseless time carving when a coping saw can remove unwanted wood faster. You will also see that a well shaped blank can save you time and frustration.
So far I have briefly informed you of two tools which are essential to carving a wood robot; the carving knife and the coping saw. Believe me, a masterpiece can be formed using only these two tools, and of course, some wood and your desire.
Wednesday, April 15, 2009
Carving Article on Carving Wood Robots
Well, it was inevitable that someone would eventually come up with a blog on carving of all things, wood robots! Most of the time old timers are carving far more interesting subjects such as cowboys and Indians or furry little creatures from a forest. Wood Robots? What was this carver thinking? Let's analyze this for a moment: What shape would allow the beginning student or not too experienced carver the best success? Aha! The stick figure! Remember when you were a child in Kindergarten or perhaps First Grade when the teacher drew on the old chalk-board, a stick figure? You were fascinated! I know I was because that same day after school, I ran home and decided I would be an artist. Mom kept those stick figure sketches for a long time, and she was really proud of me.
My original blog, "Carving Wood Robots" will attempt to inspire you into doing what has given me unlimited pleasure, carving wood robots. I will let you in on the secret to all of this carving wood robots craze. If you haven't quite figured it out, it is really simple: A wooden robot is just like that old stick figure the teacher drew for me on the black board. Now think like a carver and imagine that in carving a wood robot, the challenge would be a lot easier that carving a human face, or the face of a bear or even a winged angel. If you study art, you realize that the more detail in a project, the more difficult it is to pursue. Carving a wood robot can be seen as a very simple way of accomplishing a wood carving.
To conclude this article, let us take a moment and visualize a carved wood robot. Close your eyes now and try to imagine how you would cut this robot shape to imitate the stick figure I have previously mentioned. Professional wood carvers begin their projects with a blank, which in carving circles means the basic shape of the desired wood for a particular project. A blank can be previously prepared with a band saw or a coping saw. Later, I will explain this in great detail, but for now, think about what I have discussed in this article. The last thought would be to envision a rectangular piece of wood standing in front of you on a table, standing upright of course, the long side in its vertical position. This is a humble beginning to carving a wood robot.
Tuesday, April 14, 2009
Carving Wood Robots
Greeting Earthlings. In an attempt to further your imagination, I will demonstrate the art of carving robots from wood. Carving wood robots is a simple way of learning wood carving techniques using simple shapes, and in no time you will be hooked!
Just how does one start creating a masterpiece from a piece of wood? Well, allow me to explain; keep it simple while expressing yourself using your mind first, your hands and finally, your heart. Like all masterpieces, yours creation must convey a part of you to your public, even if your audience is limited to your family and friends.
Before going on, you must understand, or at the very least, be aware that most people consume years of practice before they reach optimum levels of carving. Patience is an understatement when it comes to mastering the art of carving. It has been my experience to find that most adequate sculptors of wood have certainly taken their time in acquiring their skills. This is not to say that it will take you longer than most to hone your skills, however, I have seen more mature carvers than those in the youth category. Once in a long while I have had the honor of meeting a few youngsters, but most of the time, old timers rule!
Subscribe to:
Posts (Atom)