Carving wood robots can be an exciting hobby if you have some extra time for yourself to indulge in. Since the beginning of mankind carving has been an intricate part of our evolution as a species; what better way to express oneself than through the oldest art form. The best part of all this is that all you need is a sharp carving knife, a coping saw and a sincere desire to create!
First of all you will need to have the following tools to work with: A sharp carving knife preferably one that holds a sharp edge, a coping saw and a small piece of basswood. The piece of basswood should measure 5 and 3/4 inches tall by 2 and 10/16 inches across by 1 and 9/16 inches deep. Basically the wood should resemble a small rectangle. I recommend basswood because it lends itself to carving, it is easy to carve into and you can purchase it from most hobby stores. If you can’t find basswood in your particular area you may try looking for some online. Wood carving supply houses could be an alternate choice.
In choosing a carving knife you may want to do a little research. These are my recommendation: choose a sharp knife preferably one that will hold an edge. This is the most important factor in carving wood robots. A razor-sharp knife is your best friend in terms of carving. Old woodcarvers all agree that a dull knife only discourages you to the point of quitting any project. A dull instrument can only bring frustration and possibly cutting accidents both on the wood and your hands! The blade should be no bigger than inch and a half. This will facilitate your handling of the instrument and keep you close to your work. A Large blade is not recommended especially for a beginning carving student. One thing to keep in mind is that we are all students and there is always something new to discover.
You might be asking yourself, "When do I start carving the wood robots?" Patience, patience and more patience.
Now, about the coping saw. Just about any coping saw will do as long as the blade is made for cutting wood and not metal. Coping saws can be purchased at any hardware store. Hobby stores and woodcarving supply houses also carry various saws. Let me recommend a coping saw that feels good in your hand and one that holds its blade steady. Some of these cheap Coping saws bend too much and are not good for cutting, especially when doing the intricate work you will engage in while carving wood robots.
In this article I will finally discuss the last factor in the opening paragraph, the desire to create. This can only come from you and your heart. Do you really want to take the time to carve a wood robot? Of course you do or you wouldn’t be reading this article. I know what you are thinking. Where are the instructions? Well, I can give some simple instructions in the next few lines but the rest will be up to you and your creativity. Let me explain. Ever since I started carving I noticed that every time I carve something, no matter how accurate the instructions are, my carvings come out different. I have carved out robots of all shapes and sizes and no matter what there are no two alike!
The following instructions are here just to get you started. If at any time you feel like quitting, do so. This is suppose to be pleasure not a difficult task. Heed my words friends, frustration leads to accidents. Yes, I have cut myself many times usually when I’m tired or unfocused. Please be careful especially when handling the knife.
Lesson #1
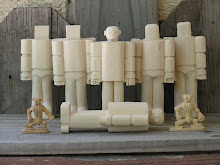
Study the drawing on this page. Print it if you have to but try and imagine it in a three dimensional manner. Let the body come out to you becoming closer than the two arms. Look at the two feet at the bottom and imagine them closer than the two legs. The square head should be further back than the upper body. The idea if for you to imagine what your first wood blank will look like in a three dimensional way.
Now all you have to do is make your blank look like the picture on this page. You will draw this figure onto your piece of basswood. The easiest way to do this is to either draw the picture on another piece of paper or simply print this from your computer. Using a pair of scissors cut around the parameter of the total drawing (follow the darker bold lines). You now have a flat outline of your blank in a two dimensional format. Place this on your piece of wood (the dimensions are mentioned at the beginning of this article) and proceed to trace the drawing onto your wood using a good sharp pencil. After removing the paper or stencil you now have a piece of basswood with drawing on it. Opposite this drawing on the back of the wood trace or draw the exact figure using the same stencil. Both sides of the wood should now have the same drawing. This is the piece of wood which you will cut using your coping saw. That’s right, now instead of a pencil you will proceed with a miniature saw, the coping saw. Follow the bold black line around the figure. Note, you do not have to draw in the lines that constitute the inside of the blank. That will come later. Naturally if you printed this figure from your computer you are way ahead.
Allow me to give you some useful suggestions on using you coping saw. Before any cutting is done find a way to stabilize your wood either on a vise or by using claps on a work table. This action will help you control the straight lines you will cut with your coping saw. Once you start sawing make sure you cut in straight lines; this is done by constantly checking all angels as you cut down the bold lines of the drawing. It is important to keep an eye on the back drawing, the blade of the saw should be aligned with the front and back bold lines as you cut. Otherwise you will have an uneven blank in the end. You will be cutting in vertical and horizontal lines only. If you change the wood on your vise you might get away by sawing vertical lines only. Cutting vertically is much easier that cutting horizontally. At the end of this endeavor you must end up with a primary wood blank that looks identical from the back as well as the front.
Other tools you may want to use from a carpenter’s tool box may include a six inch square, a ruler, a pencil with a good eraser, some wood files and anything else that will help you cut a straight line on the basswood. After you finish this lesson, you may want to take a break. This concludes the first lesson on carving wood robots. Keep checking this site for further lessons. Until next time, keep carving wood robots.
First of all you will need to have the following tools to work with: A sharp carving knife preferably one that holds a sharp edge, a coping saw and a small piece of basswood. The piece of basswood should measure 5 and 3/4 inches tall by 2 and 10/16 inches across by 1 and 9/16 inches deep. Basically the wood should resemble a small rectangle. I recommend basswood because it lends itself to carving, it is easy to carve into and you can purchase it from most hobby stores. If you can’t find basswood in your particular area you may try looking for some online. Wood carving supply houses could be an alternate choice.
In choosing a carving knife you may want to do a little research. These are my recommendation: choose a sharp knife preferably one that will hold an edge. This is the most important factor in carving wood robots. A razor-sharp knife is your best friend in terms of carving. Old woodcarvers all agree that a dull knife only discourages you to the point of quitting any project. A dull instrument can only bring frustration and possibly cutting accidents both on the wood and your hands! The blade should be no bigger than inch and a half. This will facilitate your handling of the instrument and keep you close to your work. A Large blade is not recommended especially for a beginning carving student. One thing to keep in mind is that we are all students and there is always something new to discover.
You might be asking yourself, "When do I start carving the wood robots?" Patience, patience and more patience.
Now, about the coping saw. Just about any coping saw will do as long as the blade is made for cutting wood and not metal. Coping saws can be purchased at any hardware store. Hobby stores and woodcarving supply houses also carry various saws. Let me recommend a coping saw that feels good in your hand and one that holds its blade steady. Some of these cheap Coping saws bend too much and are not good for cutting, especially when doing the intricate work you will engage in while carving wood robots.
In this article I will finally discuss the last factor in the opening paragraph, the desire to create. This can only come from you and your heart. Do you really want to take the time to carve a wood robot? Of course you do or you wouldn’t be reading this article. I know what you are thinking. Where are the instructions? Well, I can give some simple instructions in the next few lines but the rest will be up to you and your creativity. Let me explain. Ever since I started carving I noticed that every time I carve something, no matter how accurate the instructions are, my carvings come out different. I have carved out robots of all shapes and sizes and no matter what there are no two alike!
The following instructions are here just to get you started. If at any time you feel like quitting, do so. This is suppose to be pleasure not a difficult task. Heed my words friends, frustration leads to accidents. Yes, I have cut myself many times usually when I’m tired or unfocused. Please be careful especially when handling the knife.
Lesson #1
Study the drawing on this page. Print it if you have to but try and imagine it in a three dimensional manner. Let the body come out to you becoming closer than the two arms. Look at the two feet at the bottom and imagine them closer than the two legs. The square head should be further back than the upper body. The idea if for you to imagine what your first wood blank will look like in a three dimensional way.
Now all you have to do is make your blank look like the picture on this page. You will draw this figure onto your piece of basswood. The easiest way to do this is to either draw the picture on another piece of paper or simply print this from your computer. Using a pair of scissors cut around the parameter of the total drawing (follow the darker bold lines). You now have a flat outline of your blank in a two dimensional format. Place this on your piece of wood (the dimensions are mentioned at the beginning of this article) and proceed to trace the drawing onto your wood using a good sharp pencil. After removing the paper or stencil you now have a piece of basswood with drawing on it. Opposite this drawing on the back of the wood trace or draw the exact figure using the same stencil. Both sides of the wood should now have the same drawing. This is the piece of wood which you will cut using your coping saw. That’s right, now instead of a pencil you will proceed with a miniature saw, the coping saw. Follow the bold black line around the figure. Note, you do not have to draw in the lines that constitute the inside of the blank. That will come later. Naturally if you printed this figure from your computer you are way ahead.
Allow me to give you some useful suggestions on using you coping saw. Before any cutting is done find a way to stabilize your wood either on a vise or by using claps on a work table. This action will help you control the straight lines you will cut with your coping saw. Once you start sawing make sure you cut in straight lines; this is done by constantly checking all angels as you cut down the bold lines of the drawing. It is important to keep an eye on the back drawing, the blade of the saw should be aligned with the front and back bold lines as you cut. Otherwise you will have an uneven blank in the end. You will be cutting in vertical and horizontal lines only. If you change the wood on your vise you might get away by sawing vertical lines only. Cutting vertically is much easier that cutting horizontally. At the end of this endeavor you must end up with a primary wood blank that looks identical from the back as well as the front.
Other tools you may want to use from a carpenter’s tool box may include a six inch square, a ruler, a pencil with a good eraser, some wood files and anything else that will help you cut a straight line on the basswood. After you finish this lesson, you may want to take a break. This concludes the first lesson on carving wood robots. Keep checking this site for further lessons. Until next time, keep carving wood robots.
No comments:
Post a Comment